All major browsers have features that help you tweak the presentation of web content, or at least HTML-based web content. We will take a look at Mozilla Firefox. If you use Microsoft Internet Explorer, Google Chrome, Opera or Safari, you should also be able to find accessibility features, but not exactly the same ones.
Zooming
The first adaptation you can make is zooming in or out: on your keyboard, press the CTRL button and simultaneously press + to zoom in or – to zoom out. Pressing CTRL and 0 simultaneously will reset the zoom level. Firefox will remember the zoom level you chose and will apply it only to the site where you set that zoom level. For example, when you zoom to 120% on Wikipedia and to 133% on Stack Overflow, and you return to these sites the next day, you will see that Firefox still displays Wikipedia pages at 120% and Stack Overflow pages at 133%.
These keyboard shortcuts for zooming also work in Google Chrome, Microsoft Internet Explorer, Safari and Opera, but the zooming increments are not the same in each browser. On Mac OS, you’ll need to use the Command key instead of the Ctrl key.
Colours and Contrast
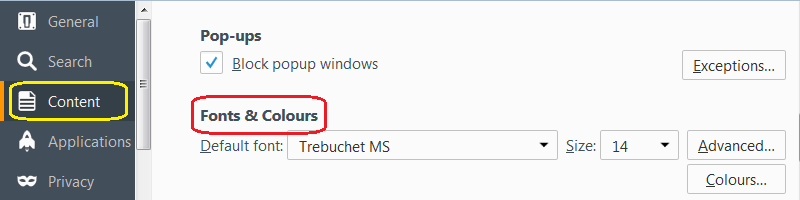
Firefox also allows you to choose the foreground and background colours for the content. Go to Options, then Content; press the Colours button.
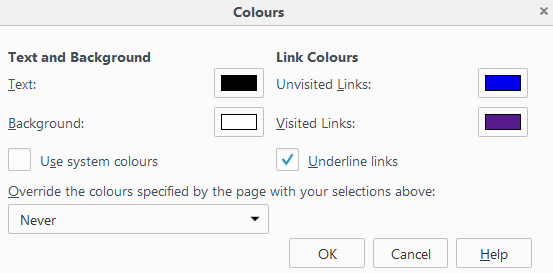
The buttons next to the labels Text, Background,
Unvisited Links and Visited Links
allow you to pick a colour from a grid with seventy colours.
In order to apply these colours, you need to do two things.
First, you need to uncheck the option “Use system colours”.
The chosen colours will then be applied to any HTML content for which the webpage
itself has not specified any colours (this is typically done with CSS style sheets).
However, since most webpages specify colours for text, background and links,
you also need to to the menu labelled
“Override the colours specified by the page with your selections above”
and change its value from “Never” to “Always”.
If you choose “Always”, your preferred colours will immediately be applied to
all web content.
If you choose “Only with High Contrast Themes”,
the effect in Firefox 54 on Windows 7 may be somewhat counter-intuitive.
You might expect that activating a high-contrast theme in Windows
will make Firefox apply the colours chose in the Colours dialog.
Instead, Firefox will display the web content in the colours defined in the
Windows contrast theme. (You may need to reload the page to see the effect.)
On Microsoft Windows, you can enable high contrast by going through the following steps:
go to the Windows button, then to Control Panel and open Personalization.
When you scroll down, you will find a few high contras themes. On Windows 7, these are
High Contrast #1, High Contrast #2, High Contrast Black (essentially white on black)
and High Contrast White (essentially black on white).
With “Use system colours” disabled, you can set your preferred colours for text, background, unvisited links and visited links, and then choose “Always” in the drop-down menu to make sure that these colours are used for every website. These settings are not site-specific, unlike the zoom level.
Font Face and Font Size
Firefox also allows you to set the default font face and font size for HTML content. Again, when you go to Options, then Content, you can choose a font face and a font size from two drop-down lists. Setting a larger default font size can reduce the need for zooming. Choosing a font face that was developed for on-screen reading can make webpages easier to read. Examples of font faces developed for computer screens include the sans-serif fonts MS Trebuchet, Verdana and Calibri, and the serif font Georgia.
Many frequently used fonts such as Arial, Helvetica and Times New Roman were not developed for on-screen reading. People with dyslexia can choose a font specially developed for dyslexics (after installing the font on the operating system), for example, OpenDyslexic, Lexie Readable or Dyslexie font.
Under “Advanced”, you can specify the default serif font, the default sans-serif font, and font faces and sizes for writing systems other than the Latin alphabet.
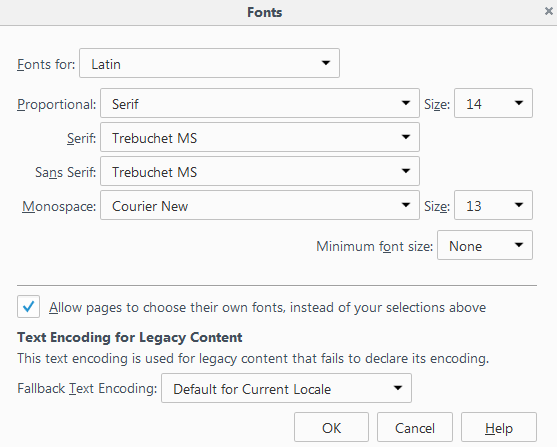
The top half of the window contains several menus related to font families.
The Fonts for menu at the top allows you to choose the script or writing system
for which you want to set font properties. It lists scripts such as
Latin, Arabic, Simplified Chinese, Cyrillic and Devanagari.
The next four menus allow you to choose settings for four generic font families:
proportional,
serif,
sans-serif and
monospace.
The menu for proportional fonts only allows you to choose between Serif and Sans-serif.
The menus for the serif, sans-serif and monospace font familiess allow you to choose a font installed on the operating system.
Note that each of these three menus lists all of the available fonts, without distinguishing between the font families they belong to.
Next to the menus for proportional fonts and monospace fonts, there is a menu where you can set the font size for these font families.
Below the menus for the font families, there is a menu for setting the Minimum font size.
Its default value is “None”.
The lower half of the window has a checkbox labelled Allow pages to choose their own fonts instead of your selections above.
This checkbox is checked by default.
Finally, there is a menu to set the fallback text encoding for legacy content.
(The menu contains a list of writing systems, not text encodings.)
Its default value is “Default for Current Locale”.
Other Browsers
Internet Explorer
Internet Explorer 11 allows you to disable or “ignore” the colours, font styles and font sizes specified on webpages, but does not allow you to specify your preferred colours in an intuitive way. In order to fine-tune the colours, font faces and other visual characteristics of webpages, you need to write a “user style sheet”, i.e. a CSS file, that defines these properties. Advice on writing user style sheets is relatively scarce and usually outdated. Most advice only covers how to apply the style sheet, not how to write it. Instructions for various browsers are available in the article User style sheets by CommerceTuned.
Interestingly, Internet Explorer 3 had a toolbar button to increase font size. This button disappeared in Internet Explorer 4. (Both the toolbar and the menu bar were removed from the default view in Internet Explorer 7 to save screen space on tablets.)
Google Chrome
In Google Chrome 58, settings for fonts and page zoom are available when you open Chrome's settings and then go to Show advanced settings. Under “Web Content”, you can then find options for font size (Very Small, Small, Medium, Large, Very Large) and page zoom (percentage values in a range from 25% to 500%). The Customize fonts … button opens a dialog where you can set the standard font, the serif font, the sans-serif font, the fixed-width font and the minimum font size. There are no options for setting foreground and background colours or for using system colours. This type of settings needs to be controlled with browser extensions.
Opera
In Opera 46, which uses the same rendering options as Google Chrome, options for tweaking fonts and colours are available in the Websites pane of the browser settings. The button Customize fonts opens a dialog where you can set the standard font, the serif font, the sans-serif font, the fixed-width font and the minimum font size. You can set the default page zoom. The button labelled Manage exceptions … opens a dialog that lists websites for which you have defined a different zoom by using keyboard commands CTRL & + or CTRL & –. As in Chrome, there are no options for foreground and background colours; these need to be controlled with browser extensions.
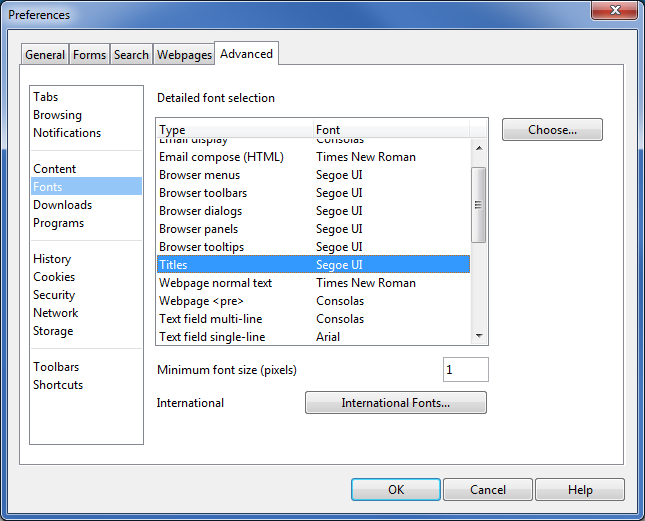
Opera 12.17, which still used Presto as a layout engine, had much more detailed options for fonts.
(Image copyright © Opera Software AS, used with permission.)
Font options on the Advanced tag of Opera 12.17's preferences
The Advanced tag in the Opera 12's Preferences dialog, contains a pane for setting font options. The biggest part of the dialog is taken up by a scrollable table with two columns: Type and Font. The Type column lists both webpage features and browser UI features, while the Font gives the font face that is currently set for the Type in the same row.
Webpage features in the table include the following:
- Webpage normal text
- Webpage <pre>
- Font-family serif
- Font-family sans-serif
- Font-family cursive
- Font-family fantasy
- Font-family monospace
- Webpage <h1>
- Webpage <h2>
The Choose… button to the right of the scrollable table opens a dialog for selecting the font face, the font size and other characteristics of the font, i.e. font weight, italic, underline, overline and strikeout.
Below the table, there is a text box for setting the minimum font size in pixels. The International Fonts… at the bottom of the dialog opens another dialog for other writing systems, such as Arabic, simplified Chinese characters, Cyrillic, Devanagari, Greek, Kanji and Hiragana.
Under Tools > Appearance, one can also set colour schemes for the browser UI, including the "System color scheme".
Early versions of Opera up till version 7 had a very visible menu with zooming options next to the URL bar. In version 8, this menu was replaced with a button that gave access to a larger number of options, including built-in style sheets for users with visual impairments.